I recently1 had the privilege of co-authoring a blog post on the Blend engineering blog with my esteemed colleague Austin Poore. Our engineering organization is growing like crazy right now and it's a lot of fun so if any of this post is interesting to you, check out our careers page. I copied this content over mostly as-is from the original post but wanted to preserve it here as well.
Contents
- Introduction
- Example Express Server
- TLS Proxy
- Load Balancers and PROXY Protocol
- Putting it all Together
Introduction
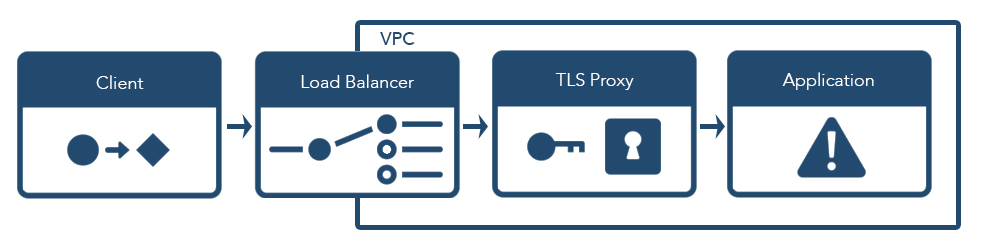
In this post, we will walk through the infrastructure components we use at Blend to secure incoming requests—a day in the life of a request, if you will. There are a variety of commonly-used mechanisms to secure cloud computing environments, which often involve load balancers and special-purpose proxy servers. As a result, requests from a client to an application server typically make a number of intermediate network hops en route to their final destination.
We'll provide a number of examples that you can run yourself as you follow along. Then, armed with our new understanding, we'll put it all together at the end and explain how, despite the intermediate hops, we can still accurately determine a client's IP address by the time a request makes it to our application servers.
Example Express Server
We'll start with the innermost server (our application server) and work our way outwards. We build many of our backend services at Blend using Node.js and Express, so that's what we'll use for our sample application server today. Though we primarily use TypeScript when writing Node.js applications, we'll use vanilla JavaScript for this example to make it accessible to a larger audience.
If you'd like to follow along, now is the time to fire up your favorite text editor. Here we go! We'll first create a web server2 using Node.js and Express:
const express = require('express');
const app = express();
const port = 3000;

app.get('/', (req, res) => {
    msg = [
    `req.ip: ${JSON.stringify(req.ip)}`,
    `req.xff: ${JSON.stringify(req.get('x-forwarded-for'))}`,
    '',
    ].join('\n')
    res.send(msg)
});

app.listen(port, () => console.log(`Example app listening on port ${port}!`));
In one terminal window, run this server3:
$ node ./server.js
Example app listening on port 3000!
In another terminal window, send a request to the server:
$ curl http://localhost:3000
req.ip: "::1"
req.xff: undefined
This server exposes one route, which returns the IP address and the value of
the X-Forwarded-For (XFF) HTTP header on the request object (more on
this later). By default, Express populates the req.ip field with the address
on the other end of the TCP socket making the connection to the server. As
expected, when we send a request from our machine to the server (also running
on our machine), we see that the requestor IP address is the familiar loopback
IP for localhost (::1 for IPv6, or 127.0.0.1 for IPv4).
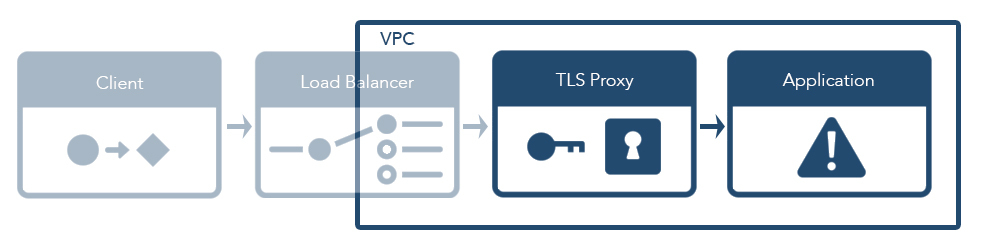
TLS Proxy
In order to secure traffic, web servers use TLS (i.e. the protocol underlying
https:// connections). Negotiating a TLS session is quite complex; we
won't go into the full details here. In order to run and test a TLS server
locally (as part of this blog post), we'll use a private key / public
certificate pair and a certificate authority (CA) that can be added to a root
of trust4.
In a microservices architecture, having many services worrying about
how to handle TLS and all that goes into it (e.g. when to rotate
certificates) doesn't scale well. Instead, a dedicated TLS proxy (commonly
referred to as a reverse proxy or ingress proxy) can be used to secure incoming
connections and shuffle traffic to and from the underlying microservices. In
the sidecar model enabled by Kubernetes, such a TLS proxy can be a very
lightweight Docker container running in the same pod as an application
container and communicating with the application directly over localhost
while communicating with the outside world securely over TLS.
In order to approximate such a TLS proxy as part of our example, we'll
use the handy caddy server5. We'll use this to run a TLS proxy on port 3443
fronting the webserver on port 3000, with the following Caddyfile6
:3443
proxy / localhost:3000
tls ./localhost-cert.pem ./localhost-key.pem
log stdout
We can run this proxy server and communicate with it over TLS7 with curl to verify that it proxies
traffic to port 3000:
$ caddy -conf ./tls.Caddyfile &
Activating privacy features... done.

Serving HTTPS on port 3443
https://:3443
...
$ curl --cacert ./rootCA-cert.pem https://localhost:3443
req.ip: "::1"
req.xff: "::1"
When a TLS sidecar container forwards an HTTP request to an application container, it attaches its view of the client IP address using the XFF HTTP header. This header is widely used, and can already contain a list of values. (For example, if a request was forwarded multiple times before entering our system, external proxies may have also written to the header.) The TLS proxy either sets the XFF header or adds an entry to the end of the XFF list if the header is already present:
$ curl \
>   --cacert ./rootCA-cert.pem \
>   --header 'X-Forwarded-For: 127.0.0.2' \
>   https://localhost:3443
req.ip: "::1"
req.xff: "127.0.0.2, ::1"
Load Balancers and PROXY Protocol
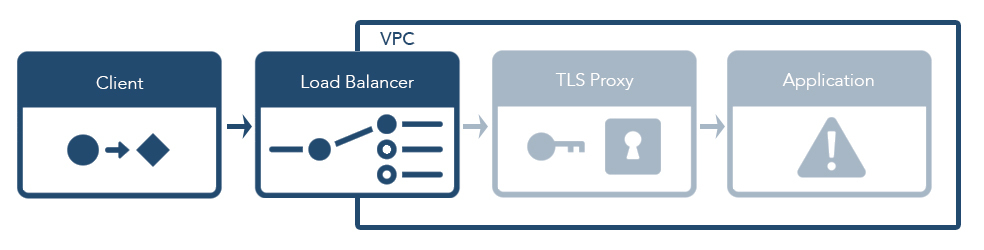
To secure cloud computing environments, it's common to isolate environments (test, beta, production, etc.) into virtual private networks. This way, traffic between internal services is secured within the private network and traffic into the network requires special access. Traffic is typically allowed into the network with a load balancer, which means that a request passes through a load balancer before making it to an application server.
There are two common types of load balancer: L4 and L7. Layer 4 (in the OSI model) represents the transport layer (e.g. TCP), whereas layer 7 represents the application layer (e.g. HTTP). HTTP load balancing can be very helpful since it can do load balancing based on path and header information and inject headers when passing traffic along. However, TLS traffic can't be decrypted unless a layer 7 load balancer is terminating the connection. As a result, layer 4 load balancers are still very common because they allow application code to handle TLS directly.

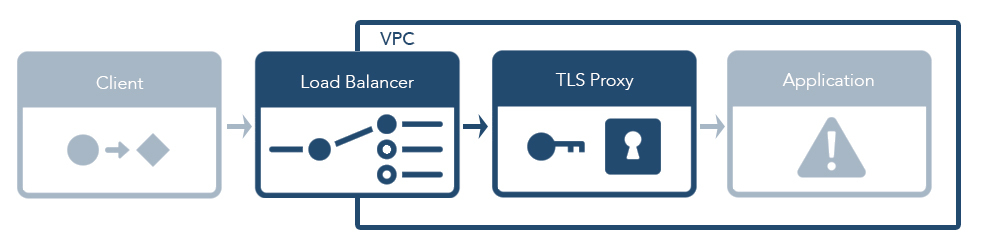
At Blend, we use layer 4 load balancers so we can use a highly configurable TLS reverse proxy. Unfortunately, since a layer 4 load balancer cannot decrypt the TLS traffic, it can't add information about the originating client when forwarding requests along to an application server. However, the client's IP address can be a crucial piece of information when validating an incoming request, so the PROXY protocol spec defines a way to pass this along. Rather than modifying the encrypted bytes, a header is prepended to the TCP bytesteam8. For example with an IPv4 connection:
PROXY TCP4 198.51.100.22 203.0.113.7 35646 80\r\n
To utilize this information, we can modify our Caddyfile to enable the
http.proxyprotocol filter9. After doing this, we can use curl to pass
along a PROXY protocol prefix and verify the Caddy server handles it:
$ caddy -conf ./proxy-protocol.Caddyfile &
...
$ curl --haproxy-protocol \
>   --cacert ./rootCA-cert.pem https://localhost:3443
req.ip: "::1"
req.xff: "::1"
However, since all IP addresses (including those in the PROXY protocol prefix)
are localhost, the example is somewhat unsatisfying. Instead, we'll use
another of our favorite tools at Blend—the Go programming language—
to simulate the example above involving 198.51.100.22. We can use a raw TCP
socket, manually send the PROXY protocol prefix and then wrap the socket in a
TLS connection10:
$ go run ./wrapped-request.go
req.ip: "::1"
req.xff: "127.0.0.4, 127.0.0.3, 127.0.0.2, 198.51.100.22"
Putting it all Together
At this point, we've developed an understanding of all of the individual pieces. In this section, we will put them all together from end-to-end and test our complete understanding by working through the full process by which we can preserve a requestor's IP address through multiple intermediate hops.
More precisely, we'd like to be able to determine the IP address used to connect directly to our system. If, for example, the caller is using an egress proxy that forwards requests from a group of machines, the address of that egress proxy is the only address that we are able to reliably verify, because anything that happened in the life of the request before the direct connection to Blend could be spoofed. To put it another way: we can only fully trust our own infrastructure.
As mentioned above, most of our backend services at Blend run with sidecar
containers11 which handle TLS and forward traffic to our
application server containers. This means that our application code does not
need to be aware of TLS—it communicates with the TLS proxy in cleartext
over localhost. Since the proxy connects to the application server in this
way, our Express server running with default settings would populate
req.ip using the address from the TCP socket (which would be localhost, as
in our initial example).
Luckily, Express is commonly used with proxies, so there is a helpful
setting we can use to instruct our server to use the XFF information on the
request to populate req.ip. In particular, we know that there is a single
trusted proxy in the request's path that is appending an entry to XFF: our TLS
sidecar. Thus, we can set app.set('trust proxy', 1) on our Express
application, which tells our server that req.ip should be set based on the
last entry in XFF. Running our server12 with "trust proxy", we see req.ip derived from XFF
rather than the TCP socket:
$ node ./server-trust.js
Example app listening on port 3000!
...
$ go run ./wrapped-request.go
req.ip: "198.51.100.22"
req.xff: "127.0.0.4, 127.0.0.3, 127.0.0.2, 198.51.100.22"
So, a typical request13 will proceed from client to application server as follows:
- Request originates at the client (e.g. IP address
198.51.100.22) and gets routed to the AWS load balancer. - The AWS load balancer reads the client IP address from the TCP socket, and uses the PROXY protocol to attach that information to the beginning of the TCP bytestream that it forwards to the TLS proxy sidecar container.
- The TLS sidecar container reads the first set of bytes from the TCP stream,
sees that they say "PROXY", and strips those bytes (plus the IP address
information) off of the TCP stream. It negotiates the TLS handshake with
the client. It also attaches
X-Forwarded-For: 198.51.100.22to each proxied HTTP request. - The application server, which is an Express server running with
('trust proxy', 1), automatically pulls the last entry fromX-Forwarded-Forand setsreq.ipto198.51.100.22.
Extended Footnotes
Observing PROXY Protocol
To concretely understand how PROXY protocol works, we can use
netcat (nc) to print out the raw TCP stream sent in an HTTP
request. Compare a regular HTTP GET
$ (echo WITHOUT | nc -l 9876 &) && \
>   curl http://localhost:9876
GET / HTTP/1.1
Host: localhost:9876
User-Agent: curl/7.64.1
Accept: */*

WITHOUT
to an HTTP GET with the PROXY protocol prefix:
$ (echo WITH | nc -l 9876 &) && \
>   curl --haproxy-protocol http://localhost:9876
PROXY TCP4 127.0.0.1 127.0.0.1 53577 9876
GET / HTTP/1.1
Host: localhost:9876
User-Agent: curl/7.64.1
Accept: */*

WITH
Generated Certificates for localhost
To generate a certificate authority (CA) and a certificate pair to be
used during local development, we use the mkcert tool. Rather than
installing this CA on our system, we'll generate it in a Docker container
and bring the generated files back to our host operating system. The
generate-tls-certs.sh script can be used to generate four PEM
files
localhost-cert.pempublic certificatelocalhost-key.pemprivate keyrootCA-cert.pempublic certificaterootCA-key.pemprivate key
and this script itself relies on the generate-tls-certs-on-alpine.sh
file.
Warning about trust proxy
Note that "trust proxy" requires that the server trusts the proxy that it is communicating with. If the client communicates directly (rather than through the proxy), the XFF header can be spoofed
$ curl http://localhost:3000
req.ip: "::1"
req.xff: undefined
$ curl \
>   --header 'X-Forwarded-For: 198.51.100.22' \
>   http://localhost:3000
req.ip: "198.51.100.22"
req.xff: "198.51.100.22"
Why --cacert Flag
The --cacert flag is required when using TLS to communicate with an
untrusted local server. If not provided requests will fail:
$ curl https://localhost:3443
curl: (60) SSL certificate problem: unable to get local issuer certificate
More details here: https://curl.haxx.se/docs/sslcerts.html

curl failed to verify the legitimacy of the server and therefore could not
establish a secure connection to it. To learn more about this situation and
how to fix it, please visit the web page mentioned above.
This is because our private key / public certificate pair has been signed
by the CA we generated above, which is not in the root of trust for curl
(or for the OS).
- It was recent when I wrote this on July 27, 2020. ↩
- See source for
server.js. ↩ - Running
server.jswill require havingnodeandnpminstalled, in a directory with apackage.jsonfile. For our example we are using[email protected],[email protected]and installing Express withnpm install [email protected] --save-exact. ↩ - See Generated Certificates for
localhost. ↩ - We install version 1 of
caddywithhttp.proxyprotocolenabled. The feature is not yet supported in version 2 ofcaddy. ↩ - See
source for
tls.Caddyfile. ↩ - See
Why
--cacertFlag. ↩ - See Observing PROXY Protocol. ↩
- See source for
proxy-protocol.Caddyfile. ↩ - See source for
wrapped-request.go. ↩ - Sidecars are separate containers that belong to the same Kubernetes pod. ↩
- See source for
server-trust.js. ↩ - See
Warning about
trust proxy. ↩